
Melbourne Brewers Experiment | Impact of oxidation on a NEIPA from packaging
Dermott Dowling
Brew Experiment conducted and written by Tom Cooper | Melbourne Brewers Club member – March 2022
Cold side oxidation is a topic that has received a lot of attention over the last few years. The internet is full of experiments showing beers suffering from cold side oxidation, with muted hop flavours, increased honey like sweetness and the horrible ‘brown’ colour seen in oxidised NEIPA’s. Whilst, I have personally had a badly packaged NEIPA from a commercial brewer, not many members at the Melbourne Brewers had direct experience with an oxidised NEIPA. To improve our members understanding of the impact of packaging practices on a NEIPA, a club experiment, inspired by Brulosophy, was conducted.
The NEIPA recipe chosen was the Hazy Trucker | NEIPA All Grain Brewers Recipe from BeerCo.com.au, a lazy hazy 8.7% ABV beer. BeerCo.com.au provided us with OYL-501 Gulo® Ale Omega Yeast, which tests positive for the STA-1 gene, an indicator of a possible diastatic yeast strain. Gulo attenuates up to 90%, so the recipe would start pushing 9.5% ABV. This was decided to be too high, so the recipe was adjusted to 7.7% ABV by adding more water, perfect for a club night.

Figure 1: OYL-501 Gulo® Ale Omega Yeast. Sold by BeerCo.com.au
My goal was to compare the effect different packaging practices would make on a NEIPA. To do this I decided to keg a single batch into two separate 9L kegs. One of the kegs would be CO2 purged by gas from fermentation (my current practice) and the other would be filled open to atmosphere (my old method).
A few nights prior to brewing, a starter was made to ensure adequate pitch rates for the beer.
The recipe was brewed on my home made 3V RIMS system on 10 December 2021, with an OG reading of 1.066. Following cooling, the decanted starter was pitched, with activity noted via Tilt hydrometer overnight. The keg to be purged was connected in between my fermenter and the spunding valve, which was set to 10kPa (1.5 PSI).


Figure 2: Fermenter setup for keg purging
The first ‘dry’ hop charge was added on the 12 December 2021 with the expected attenuation already at 80%. Prior to opening the fermenter and adding the dry hop charge, the keg being purged was removed from the brewing setup. This gives an estimated oxygen concentration of under 1ppb in the purged keg (Using the calculations from https://www.themodernbrewhouse.com/kegging-care-guide-purging-transferring-stabilizing-finished-beer/)
The second ‘dry’ hop was added 5 days later, and the beer was packaged into two separate kegs on 30 December 2021.
The purged keg was filled via a closed system. The fermenter was pressurised with CO2 and the beer transferred to the purged keg using the spunding valve to release the extra CO2. The open keg was filled with the lid open and without being purged by CO2. Once filled, the lid was fitted to the open keg and the head space was purged by applying CO2 to the keg and venting via the PRV. This process was done 5 times.


Figure 3: Filling the Kegs
Both kegs were placed in my kegerator and carbonated to the same CO2 volume by ensuring the pressure was identical.
The kegs were left to sit for 4 weeks until the club meeting on January 26 2022.
The beers were served to 14 club participants in a triangle test (2 samples from the non-purged keg and 1 from the purged keg). Only 4 club members were able to correctly identify the different beer (I excluded myself from these results) – same chance as random guessing.
Out of the 4 people who got this right, 3 identified the brighter hop aroma as the main difference and one admitted it was purely a guess.
Interestingly, several members identified one of the ‘non-purged’ sample as being dull compared to the other two, which is a characteristic of an oxidised beer.
My Impressions
To say I was surprised with the result of this experiment is an understatement. To me, the difference in these beers was significant and I thought the results would be too. The beer from the purged keg had a far brighter hop aroma, with the hops being sharper. The beer that was packaged open to atmosphere had subdued hop flavours and aromas. I was served a blind triangle test at the meeting and quickly identified the beer from the purged keg.
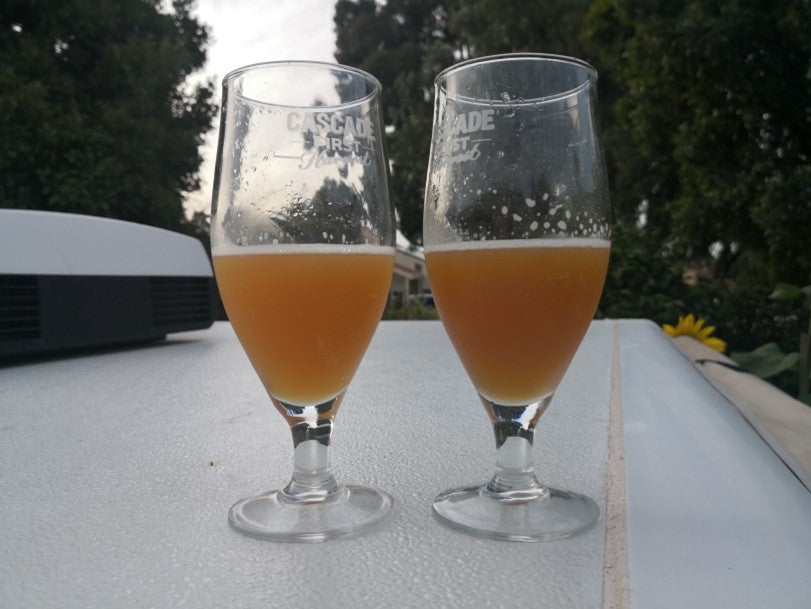
The colours of the two beers were very similar, with the open keg being slightly darker, depending on the light.

Figure 4: Purged keg left, open keg right (prior to club meeting)
It is known that oxidation has a severe impact on the stability of flavours in the beer, with hops being noted to have muted flavours and it can result in a honey like sweetness. However, participants in this test were not able to reliably tell the difference between the two beers. This could be due to the ‘poor’ packaging process sufficiently limiting the amount of oxygen exposure or not leaving enough time for the difference to appear.
Two weeks following the meeting I tried the two beers again. To my palate, the differences were even more striking, with the hop aroma and flavour continuing to fade in the non-purged keg. The purged keg was still had bright hop aroma and flavour.
[Editors notes: Tanks Tom for this most excellent Beer Experiment! We all learn by brewing and doing experiments and side by side comparisons like this one are really worthwhile. If you have similar studies you would like to share with us and our readers please drop us a line anytime to Service@BeerCo.com.au and continue to brew happy, brew better, brew like a pro and share what we know so we can all brew better beer today and tomorrow! cheers #enjoyresponsibly #brewhappy - Tanks Tom! and the Melbourne Brewers for sharing this learning with us and our readers]